


Hello friends! I have tested three different methods for making half rectangle triangles for quilt patterns and I am sharing them all with you. I have one pattern in my shop, The Origami Quilt Pattern, that practices using these shapes. I believe this was only the second or third pattern I had ever made and when I jumped into the HRT world I found it very confusing. If you ask me - the secret is in the trimming. Let's jump in!
Let's start with the math! If you aren't following a quilt pattern you'll want to calculate the finished size of your blocks first. I want my blocks to be 3" x 6" finished. This means once it is sewn into my quilt top it will be 3" x 6". When it is trimmed and waiting to be sewn to another block it will be 3 ½" x 6 ½". Make sense? Here's the math for you to calculate your own block:
Piece Cut Length: Finished Length + 2"
Piece Cut Width: Finished Width + 1"
So my pieces are 4" x 8" because I want my block to be 3" x 6" once it is sewn into the finished quilt top.

Method 1: Traditional Method
So you have your pieces cut using the handy math above and you're ready to start sewing these up the traditional way. First, the direction of your fabric and will matter here. If you are wanting the pattern on your fabric to finish in a certain direction you're going to have to pay attention to your cutting here. You'll see more what I mean in the end when you see the finished blocks. Cut across corner to corner to separate your rectangular pieces:

Next separate your cut pieces and lay them out so look like your block. (Notice the direction of the fabric based on what we just cut. If you're wanting the opposite you will have to do this a second time cutting from the opposite corners.)
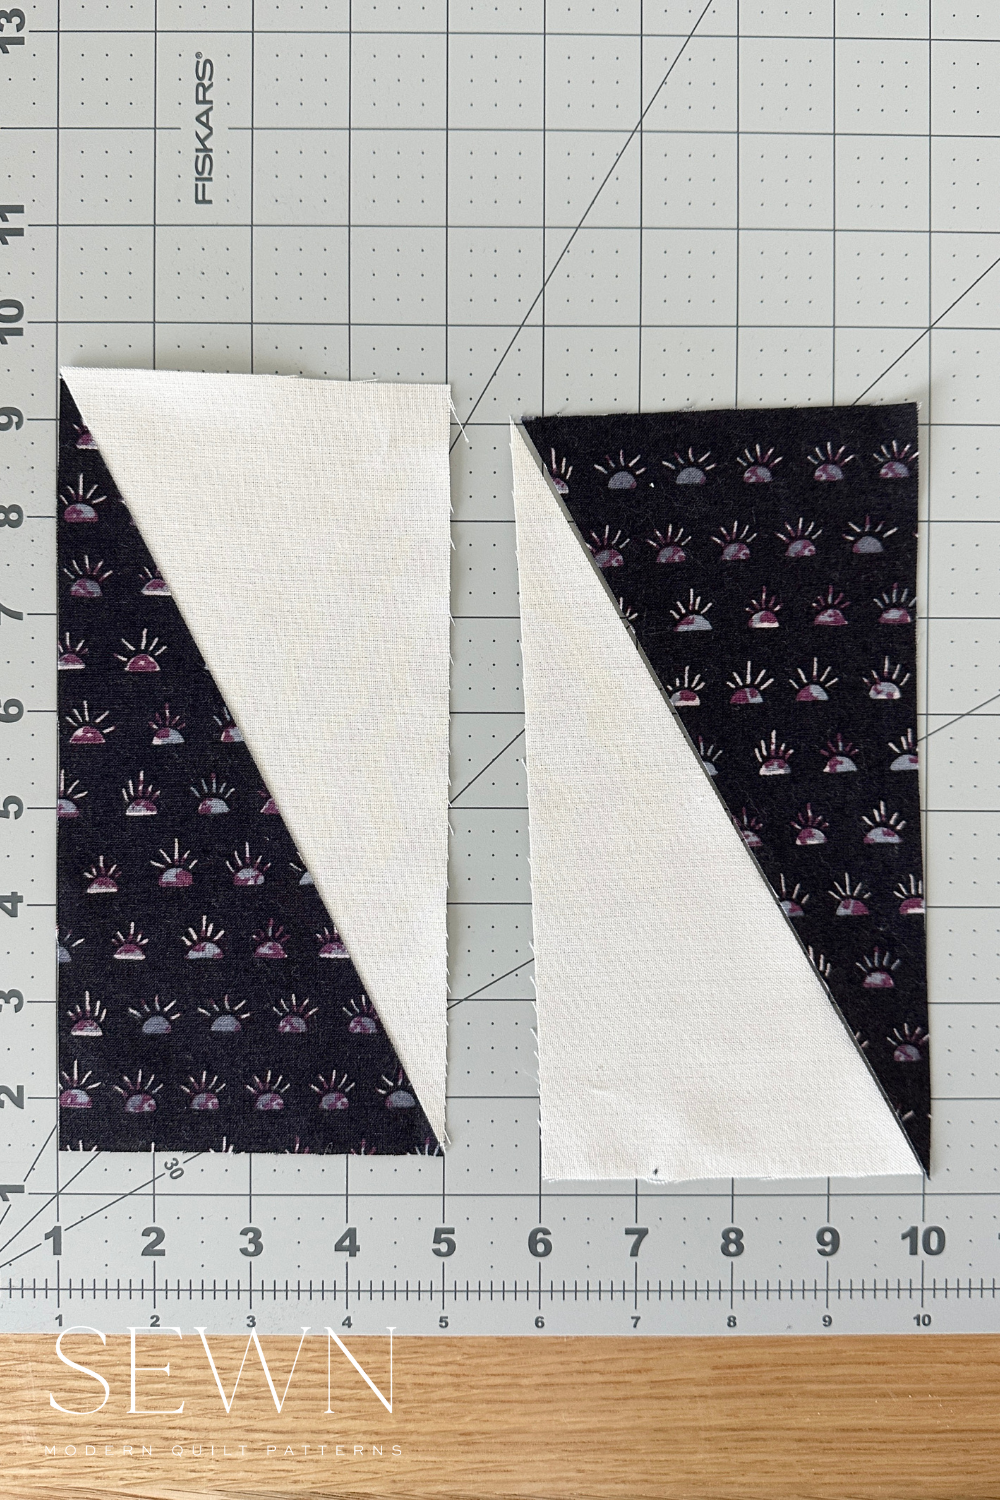
Flip the triangle on the right over the top of the triangle on the left so that right sides are together.

Let's zoom in on that - Make sure there is ¼" offset on either end:

Sew these two together with a ¼" seam allowance. I like to use my walking foot because it keeps all the fiddly little ends together better I think. Then head to your ironing board. I like to finger press mine open first.

Then I flip them over and press the seams open. I think I'm converted to open seam pressing now. It lays so much flatter in the quilt top! Also consider using a tailors clapper to really make that seam flat!


Next to the most important bit - trimming. Remember I want these to be 3 ½" x 6 ½" so I trimmed about an ⅛" off either side to get the width down to 3 ½" first. So, check your width first.
Then the length needs to be 6 ½" so I am using my hand 6 ½" square ruler to make this easy. Lay the ruler so that there is a ¼" width at the top of each triangle. See the image for a more clear indication of what I'm referring to.

These HRT are done! I really like this method because I feel the trimming allows a little more wiggle room for error.


Method 2: Two at a Time
After a trial of all three of these methods I think this one leaves the most room for error so I probably won't use this again in the future, but give it a shot and see what you think! Start with your rectangles. Using the same math above mine are cut to 4" x 8".
With right sides together lay one rectangle on top of the other so that the corners line up like the photo below. Draw a line from corner to corner and pin your blocks together.

Again I used my walking foot and sewed 1/4" outside of the line on both sides. (This is very similar to the eight-at-a-time half square triangles method if you have done that before.)

Cut along the line and you have two half rectangle triangles. Press them open and let's trim!

With this method I found that both were already at 3 ½" wide so I didn't need to trim the sides. Line up your ruler just like the traditional method leaving ¼" at the tip of each triangle like you see here:

You're done! Try this method for yourself and let me know what you think. This one made me feel like I needed to be perfectly accurate in my sewing for them to turn out correctly.

Method Three: The HRT Ruler
This method is definitely the fastest!! I really like this handy little ruler. If you purchase this same Creative Grid Perfect Rectangle Triangle Ruler it comes with a little guide on how to cut and prep these. You can even pair it with the Creative Grid 60 Degree Triangle Ruler to make other blocks too! So nifty!
With the ruler you just start with your triangle pieces. The guide says for a 3" x 6" finished HTR I'll need to add a ½" so using the 6 ½" mark I'll cut the triangles.

Flip right sides together and sew with a ¼" seam allowance just like method one and take it to your ironing board to press open.

With the ruler you don't have much room for trimming so you do have to be really accurate. The ruler already includes that ¼" of space at the tip of each triangle. So, once it's pressed open all you have to do is trim the dogears and your block is done! So speedy!

Choose a method and practice your new skill with the Origami Quilt Pattern! This quilt pattern includes a wall hanging pattern in a smaller scale too!

Want another pattern to practice on? Try the Oliver Quilt Pattern!

Very clever, I liked the traditional method. Thank u 4 sharing.
Thanks so much! Your tutorial is very concise and clear. My HRTs came out perfectly! I was a bit intimidated at first, but you made it quite easy and doable!
Thanks for this very clear and clever tutorial on Half Rectangle Triangles. These units are very tricky as you must factor in three things: height, width, that 1/4" offset seam at the corners. It can be very challenging to get the points to come out in the finished work…but if you do, they look great!
Thank you for such a thorough explanation. So helpful! I appreciate the time you put in to making this and freely sharing it.