

Some of the links below are affiliate links, meaning, at no additional cost to you, I may earn a small commission from the sale if you click through and purchase.

Quilt pictured here is the Playroom Quilt Pattern.
Sometimes our furry friends get a little too excited and "love" on our favorite handmade quilt a little too much...
After you have taken a deep breath and wiped away those tears - this blog post will be here to guide you through getting that quilt patched up!
(You can't stay too mad at this face!!)

Let's get started...
Match Your Fabrics:
This is why it is beneficial to keep some of the scraps you have leftover after making a quilt. I still had fabric in my stash from this quilt that I made a few years ago which was very lucky. I needed fabric for the top and the back of the quilt. If you don't have the exact fabric you have a few options:
- Take a piece to your local quilt shop and see if they have any leftover. (Don't forget to check those scrap bins!)
- Buy something that matches as close as possible. A patch will never be invisible so finding something that is close enough will still do the trick!
- You can also get crazy and go with fabric that is complete different to make the patch purposefully part of the quilt. Make it stand out if you want! It's like a battle scar.

You might also enjoy reading:
-
Caring for Your Quilts
-
For My Boy Fabric Collection
-
Five Beginner Quilt Patterns
-
Sewing Machine Maintenance
-
Cost of a Handmade Quilt
-
Quilt Labels
-
Easy Quilting Designs
-
Quilt Binding Five Ways
Square it Up:
I know this bit can look scary, but you have to get rid of the ragged edges. (Deep breaths, remember.) My plan was to make two entirely new blocks so I trimmed the edges with about ½" of quilt left to attach to with my replacement blocks.

Quilt pictured here is the Playroom Quilt Pattern.
Make Your Patch:
I made two of the blocks I was replacing and also cut a pieces of batting and backing. The batting I laid in the hole and cut to the same size as the hole. Then, I cut the backing about ½" larger so I would have enough room to turn the edges as you'll see in the next step.


Create "Finished" Edges:
My blocks fell on the edge of the quilt so I only needed to create three finished sides by pressing them over ¼" with my iron. I also used a temporary glue to heat set them and ensure they would not come undone. (The fourth edge will be finished in binding in my situation.) If you have a full patch to make, press all four sides of your replacement blocks and the backing to create finished edges.


This pressing ruler comes in handy all the time!
Create A Quilt Sandwich:
Just as you would with a complete quilt - make a tiny little quilt sandwich with your patch, your batting and your backing. I pinned mine into place with some basting pins, but you could use clips, temporary glue or a basting stitch if you prefer.

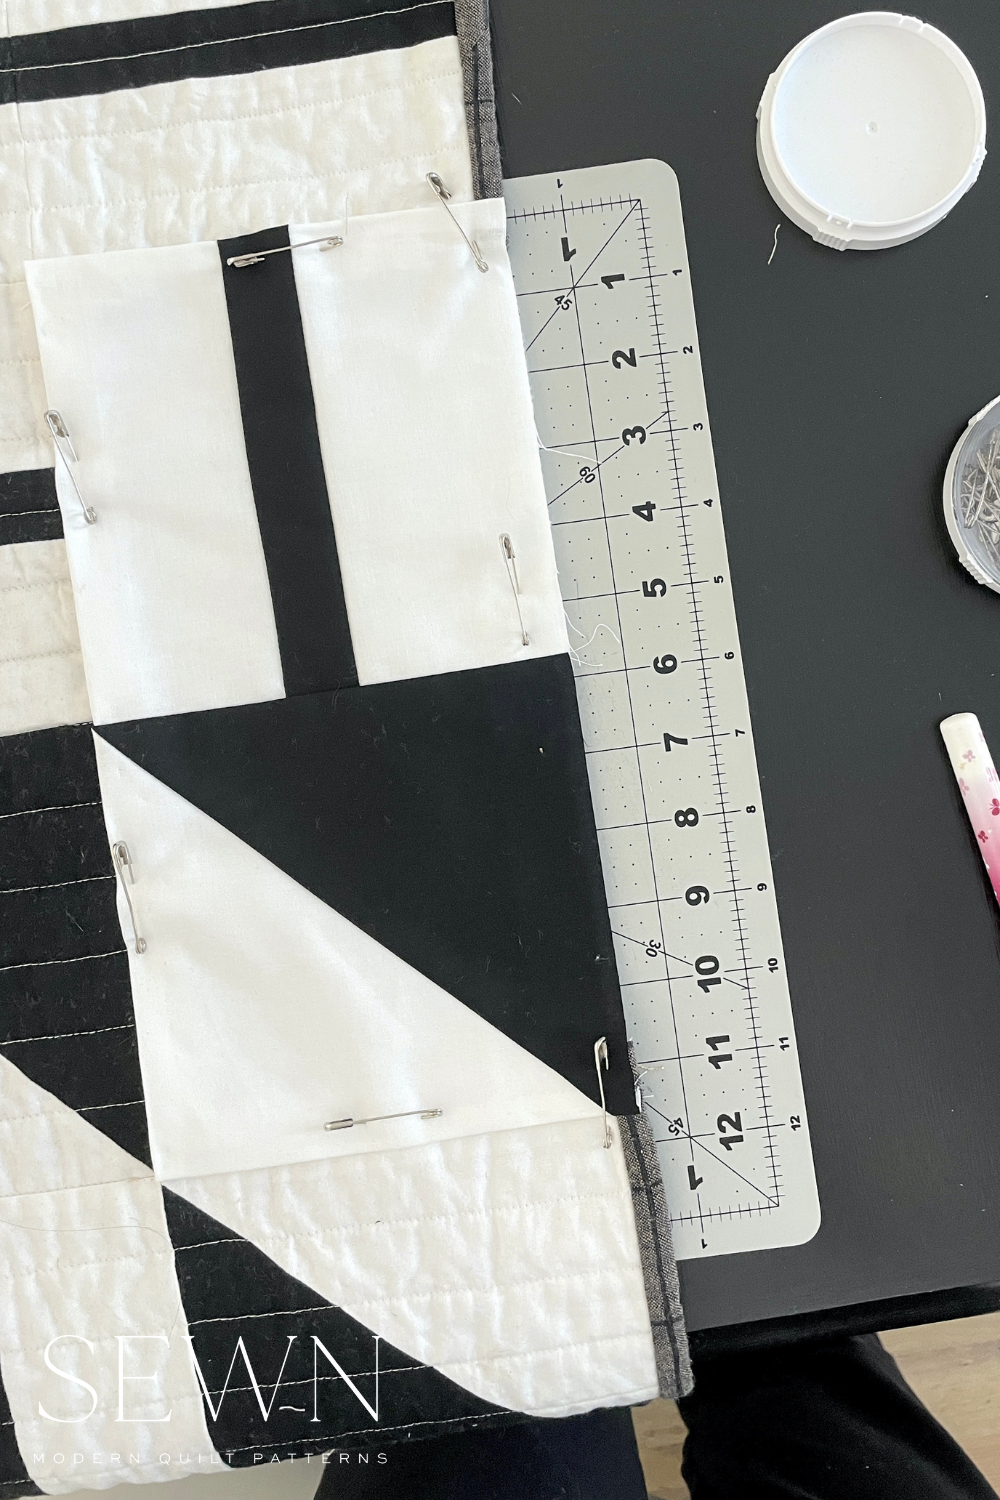
Sew Your Patch On:
Both the top and back patches should be 1/2" larger than the hole you cut earlier. Using an invisible stitch, sew around the perimeter of the patch on the top of the quilt. Next, flip the quilt over and do the same for the back. (I moved some more basting pins to the center of the block to make sure the batting stayed in place.

Quilt Over Your Patch:
If you can, line up your quilting and try to match the design. If it's an intricate design you can try to stencil it with an erasable pen or try to find an image online to print and match.

Add Binding: (if needed)
Like I said - my patch fell on the edge so I was able to create a finished edge with binding on the side. I cut my binding just slightly longer than the patch and pressed the two short edges over to create a finished edge. Then I folded the two long sides in, pressed them and wrapped it along the edge. Hand stitch it down and you're all set!


You're quilt is good as new! An important thing to remember here is that we are not aiming for perfection. The quilt was perfect before our little furry friends made their edits. Now this quilt has character and style! You can clearly still see it's been patched, but it's now able to be used again.
I hope this was a helpful post for anyone who has a quilt that needs repairs. Fear not - it can be fixed and loved for years to come!

Quilt pictured here is the Playroom Quilt Pattern.
You Might Also Enjoy:
Tips for Sewing Curves
Free Quilted Pillow Tutorial
Free Sunroom Wall Hanging Tutorial


Thank you so much. This is exactly what I’ve been looking for and I appreciate the time you put in to the clear explanation.
Wow, like new!! thank you
Fantastic tutorial. Exactly what I needed for my neice’s beloved quilt that her darling dog chewed a hole completely through. Thank you.
Hello — I have one dozen quilts (circa 1940 – 1970) that belonged to my family and left to me. I am looking for tutorials that can teach me “best practices “ of quilt restoration. This piece you wrote is a “keeper.” Thanks, Jo
Great tutorial on repairing a quilt! I have a king sized quilt that needs new binding (I’ve put that off) and it also has a couple of places on the edges where my sister’s puppy loved it too much! Thanks to you I have a plan for fixing it!
Many thanks. And love your sweet Weim’s face. I have 2 😊